Posted on 6 Comments

Download this Veteran’s or Memorial Day Hero Printable

Veteran's Day Printable and Quotes
Please take a moment to remember the sacrifices of the men and women who fought to make America the greatest nation on Earth.
 
We wish to honor the sacrifices our veterans have made for our freedoms. Thank you, to all who have served.

Here is a free printable that you can use to frame or use on crafts. Please share with all the Hero’s in your life!

Download the printable

Memorial / Veterans Day Printable

Veteran’s Day Quotes

Thank you for this collection of Veteran’s Day quotes that were originally posted on the Huffington Post.

“Freedom is never free.” -Author Unknown

“How important it is for us to recognize and celebrate our heroes and she-roes!” -Maya Angelou

“When our perils are past, shall our gratitude sleep?” -George Canning

“Courage is almost a contradiction in terms. It means a strong desire to live taking the form of readiness to die.” -G.K. Chesterton

“This nation will remain the land of the free only so long as it is the home of the brave.” -Elmer Davis

“But the freedom that they fought for, and the country grand they wrought for, Is their monument to-day, and for aye.” -Thomas Dunn English

“I think there is one higher office than president and I would call that patriot.” -Gary Hart

“Lord, bid war’s trumpet cease; Fold the whole earth in peace.” -Oliver Wendell Holmes

“As we express our gratitude, we must never forget that the highest appreciation is not to utter words, but to live by them.” -John Fitzgerald Kennedy

“The most persistent sound which reverberates through men’s history is the beating of war drums.” -Arthur Koestler

“I dream of giving birth to a child who will ask, ‘Mother, what was war?’” -Eve Merriam

“Valor is stability, not of legs and arms, but of courage and the soul.” -Michel de Montaigne

“In war, there are no unwounded soldiers.” -Jose Narosky

“We often take for granted the very things that most deserve our gratitude.” -Cynthia Ozick

“The more we sweat in peace the less we bleed in war.” -Vijaya Lakshmi Pandit

Please Rate:
Posted on 4 Comments

How to Keep House Sparrows Off Suet Feeders

Keep House Sparrows Off Suet Feeders

Do you have a suet feeder that is being taken over by invasive birds such as House Sparrows (HOSP)? Do you watch helplessly as your feed disappears and the desirable birds get chased away? If you are interested in learning how to keep House Sparrows off suet feeders, please read further!

Materials:

  • Wire hanging suet feeder
  • Suet Cake
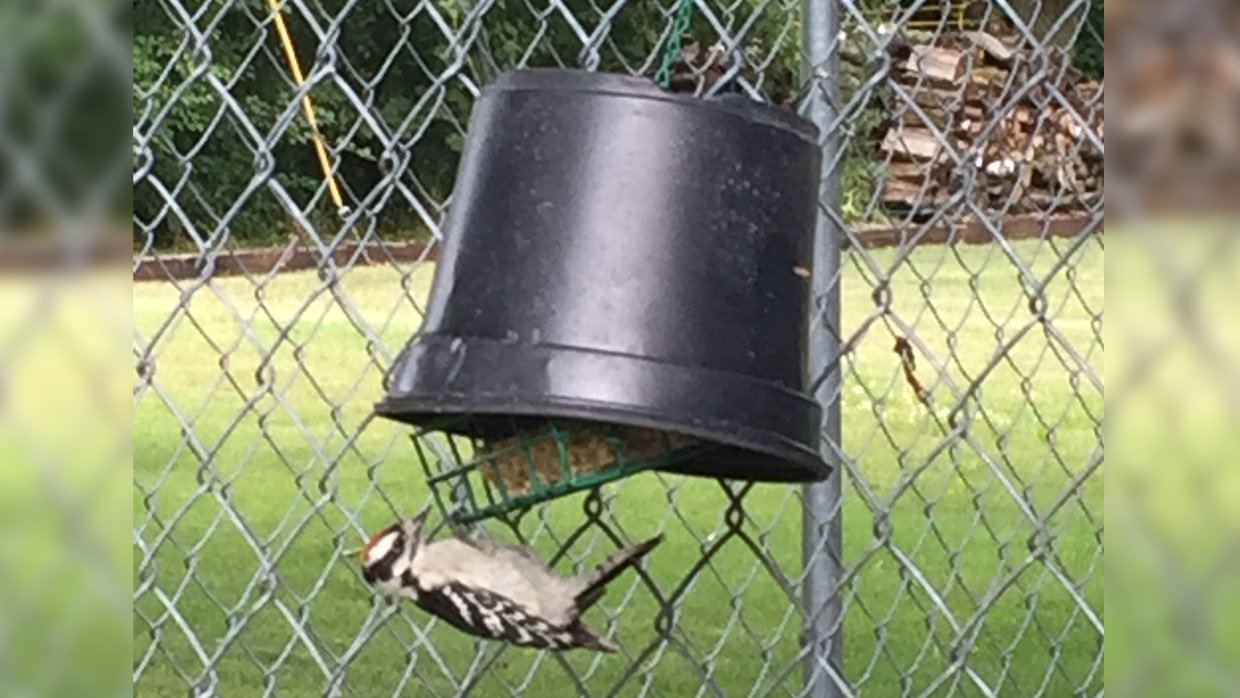
  • Cover for suet feeder (I used a plastic flower pot)

Earlier this Spring I realized that I was not attracting as many birds to my yard as previous years. I waited and watched, but became a frustrated looking at the bird bath and feeders sit vacant. I usually get Downey Woodpeckers at my suet feeders, so as an attempt to bring ANY birds back, I put out my suet feeder early. This was something I had usually only put up in the fall and winter because I thought suet would melt, but recently learned that you could use certain types of suet all year.

I hung the suet feeder out on the chain-link-fence of our dog’s kennel and waited for my Woodpeckers to arrive. What happened next shocked me. Within a few days I had birds – LOTS of birds. Lots and lots of House Sparrows to be more specific.

At first I didn’t mind. I wasn’t familiar with how much of a nuisance House Sparrows can be and I also felt like other species of birds followed … but I quickly learned how bad it can get!

Within hours the sparrows could devour the entire suet cake. I started to wonder if I would need to make my own suet to afford feeding the birds, but I could see that feeding them was only making the problem worse. It quickly became a mission to deter Sparrows from consuming everything within their reach and bullying the more desirable birds.

After a bit of research, I learned that I had to make two adjustments to discourage the House Sparrows.

Keep House Sparrows Off Suet Feeders

1. Remove the Suet Feeder from the Fence

Sparrows approach landing on feeders from the top. If you watch them, you will notice that they will try to avoid coming up from the bottom. By putting the feeder on the fence, it not only allowed them to approach the suet feeder from the top, but also encouraged them to all flock together on the fence and over-take the suet cake. (Some suggest using Feeder Halos, but I felt it would lose its effect over time, and could harm birds in the process.)

I removed the feeder from the fence and hung it under the overhang of my house. It also had to be far enough away that they could not jump to it from another perch. The results were noticeable! The flocks were gone and most sparrows did not attempt to land on it. While I noticed some daring ones, they were few … for a few days.

They learn… They adapt… They eat a lot of suet!

After a few days, the numbers of sparrows were not as high as when it was hanging on the fence, but this was not an acceptable solution on its own. I had to make another adjustment.

2. Cover the top of the suet feeder

Sparrows cannot hang upside down to eat, but song birds such as the Woodpeckers, Nuthatches and Chickadees are very comfortable hanging while eating. Covering the top portion keeps sparrows from being able to reach the suet.

I noticed that there are a few models of covered suet feeders for sale, but before I invested I wanted to make sure this technique would work.

I simply took the square feeder that was hanging vertically and moved the chain to hang it horizontally. (fig 1) I had a plastic flower pot that fit the top, so I covered the top portion and left the bottom exposed.

(fig. 1) Suet Feeder Horizontal


Suet Feeder Hanging
Suet Feeder Hanging

I tried to hang it back on the fence (as seen in the top image), but the sparrows perched below the feeder and were able to eat the suet. I put the feeder back up under the overhang.

These steps combined made all the difference. I have had this up the entire summer and fall, and the sparrows have all but given up! While the sparrows are gone, I have the more desirable birds visiting and feeding comfortably at the suet feeder. I am able to enjoy my birds without going broke in the process!

If you would like to keep House Sparrows off suet feeders, try these tips together.

To summarize

  1. Hang the feeder under an overhang to discourage top landing
  2. Cover the top of the feeder to only allow birds that can hang upside down to feed
  3. Enjoy your backyard birds!

Do you have any other suggestions to keep sparrows off your feeders? Please share in the comments below.

Thanks for reading,
-Tracy

Please Rate:
Posted on 3 Comments

10 Fabulous Handmade Halloween Pet Costumes

Olaf Pet Halloween Costume

Halloween is on its way and it’s just not the same unless your furry friends join in the fun. With so many costumes available online for your pet, I thought it would be great to find some unique looks that also support those who hand-craft their products. I was not disappointed! Your pet will be the talk of the neighborhood if they are sporting one of these amazing handmade Halloween pet costumes.

Pokemon GO!
Perfect for the gamers or smart phone lovers! Show how much you and your pet love to be on the move with this adorable Pikachu costume.

Pikachu Pet Halloween Costume
Photo Source: PetitDogApparel on Esty – Pikachu Pet Halloween Costume

Available for sale

Movie Character Handmade Halloween Pet Costumes

My daughter loves the movie “The Nightmare Before Christmas” so we HAD to include this Jack Skellington hat for your furry friend.

Jack Skellington Halloween Pet Costume
Photo Source: FauxPawsAccessories on Etsy – Jack Skellington Halloween Pet Costume

Available for sale

May the force be with you with these striking “Star Wars” costume for your dog or cat. You can choose the Force (or Ashala) with this Yoda costume, or perhaps you are more interested in going to the Dark Side with Darth Vader this year?

Yoda Pet Halloween Costume
Photo Source: FroodiesHoodies on Etsy – Yoda Pet Halloween Costume

Available for sale

Darth Vader Pet Halloween Costume
Photo Source: thecaliforniachi on Etsy – Darth Vader Pet Halloween Costume

Available for sale
Looking for a lighter theme? How about these amazing “Frozen” costumes? I could not help but smile at this Olaf the Snowman costume. What a perfect combination with these Elsa and Anna costumes as well!

Olaf Pet Halloween Costume
Photo Source: sewdoggonecreative on Etsy – Olaf Pet Halloween Costume

Available for sale

Frozen Princess Pet Halloween Costume
Photo Source: rufflerunway on Etsy – Frozen Princess Pet Halloween Costume

Available for sale

The season is not complete without dressing your Guinea Pig up as Harry Potter. I REALLY want to know how they got him to keep those glasses on!

Harry Potter Pet Halloween Costume
Photo Source: Crafted4Pets on Etsy – Harry Potter Pet Halloween Costume

Available for sale

Traditional Handmade Halloween Pet Costumes

For those who are looking for a more traditional Halloween costume for your pet, don’t worry, we have you covered as well. Take a look at these adorable Frankenstein and pumpkin outfits for your pets. These fit right in with the trick-or-treat season!

Frankenstein Pet Halloween Costume
Photo Source: TheHoundHatter on Etsy – Frankenstein Pet Halloween Costume

Available for sale

Pumpkin Halloween Costume for Pets
Photo Source: Crafted4Pets on Etsy – Pumpkin Halloween Costume for Pets

Available for sale

I was looking for a great dinosaur costume to showcase, and I could not pass up this fabulously-glam outfit for your pet. What a way to make a statement!

Dinosaur Halloween Costume for Pets
Photo Source: IronicEmbroidery on Esty – Dinosaur Halloween Costume for Pets

Available for sale

There you have it, 10 amazing handmade Halloween pet costumes! The spooky holiday is right around the corner, so if you are looking to get these incredible outfits on your pet this season, I would hurry as time is running short!

Do you have any unique pet costumes you can share? Let me know below!

Thanks for reading,

-Tracy

Please Rate:
Posted on 2 Comments

10 Simple and Natural Fall Allergy Remedies

Natural Fall Allergy Remedies

As the temperature dips and the leaves change, are you one of the unlucky ones whose nose is running and eyes are itching? Does the congestion in your sinuses let you know that Fall is on the way? If you suffer each year with seasonal allergies to pollen, mold and dust, then try some these non-diet related, natural fall allergy remedies.

10 Natural Fall Allergy Remedies

  1. Wear Those Shades
    Wear sunglasses outdoors to reduce the amount of pollen that reaches your eyes.
  2. Plan Your Day
    Try to limit your outdoor exposure to early mornings or to early evenings when pollen counts are usually lower.
  3. Block Out Those Allergens
    Keep windows and doors to the outside shut as much as possible to keep pollen from entering the home. Keeping your air conditioner on throughout this season on may reduce your exposure to allergens.
  4. Scrub Down Those Surfaces
    Wash down walls and surfaces with soap and water weekly to remove pollen that has entered the home.
  5. Suck Up That Dust
    Vacuum all soft surfaces weekly with a HEPA rated vacuum cleaner filter to remove dust and pollen.
  6. Clean Those Hard-to-Reach Areas
    Have your duct work cleaned out and your chimney swept yearly to reduce the pollen an soot that has collected in these areas of your home.
  7. Stay Squeaky Clean
    Shower and wash your hair each night to remove the pollen that has collected on your body throughout the day.
  8. Pet’s Need a Bath Too!
    Scrub those pets who venture outdoors to help remove the pollen that collects on their fur.
  9. Flush Away the Pollen
    Use a saline nasal spray to flush pollen out of your nasal cavities each day. Some suggest using a Neti Pot to flush the sinuses, but it is recommended that you learn of the dangers before you use one. Also, flush eyes with clean water if you have been exposed to the allergens.
  10. Cover Your Face
    Wear face protection such as a mask when working in the yard.

There it is, 10 easy ways to help combat those seasonal allergies. Can you come up with any more natural fall allergy remedies to share? Please let me know in the comments below.

Thanks for reading!

-Tracy

Please Rate:
Posted on

How Can Your Failures Lead to Success?

Can Failures Lead to Success

I have a confession to make.

I am a failure.

Financially and professionally I am a complete and utter failure. I was naive and foolish and things did not go as planned for me, that’s for sure.

Let me tell you why.

Can you relate to the dream where you want to be financially free? To make your own rules and live life on your own terms? I had that dream – big time. I had been laid off for the third time from my job, we were broke and I definitely wanted a change. I knew exactly what I wanted to do with my online business, I just needed someone to help me build it.

I thought I did my homework.  I put my heart and soul into writing an air tight business plan and once I had all the details in place, I hired a highly recommended overseas web development company to build me that dream.

Can you imagine the excitement and anticipation I was feeling! I could hardly sleep those first few months.

… But then there was the waiting.

And the delays.

And the missed deadlines or requirements.

And the pulling out of hair in utter frustration.

Don’t get me wrong, the project was complicated but going well enough for me to continue to pay them. Unfortunately, it never was exactly what I wanted. They would rework it and try to fix it, but it just led to more and more delays. They clearly did not understand the requirements, I was in way over my heard and the project started to feel like a money pit.

Then disaster struck. They “lost” all the files in a server crash and had to start over. To say I was devastated was an understatement. While I found it difficult to believe they had no backups, I helplessly allowed them to start over.

It didn’t go well the second time.

Eventually the project just collapsed. After they were running 18 months past the launch date and no longer showing a solid commitment to the project, I made the gut wrenching decision to just walk away. I just couldn’t afford to stick any more money into it and trying to get money back from an overseas provider wasn’t a mountain I knew how to climb. I understood how naive I had been, and I was emotionally spent.

The emotional toll was bad enough. What I didn’t mention was that in order to pay this web development company, I had put a second mortgage on our home. A big one for us, and now I had nothing to show for it – except a hefty monthly payment.

Imagine the shame I felt each month when I had to write a loan check for three more years to pay off this failed business venture. Imagine trying to look my husband in the eye when we were barely making ends meet. I was still out of a job and this extra mortgage was the reason we couldn’t move to be closer to job opportunities.

These were certainly not my happiest days. I felt like my dream had died and my family was paying a big price for it.

I felt like a total failure.

But was my dream truly dead?

Thankfully, during my many months of frustrating work with the web development company, I did not just sit idle. In trying to learn why the project was failing, I took coding classes. I read tutorials on databases and I took on practice projects on my own. After my project failed epically, I realized I had learned enough to land a few contracting jobs as a web developer!

I also started networking and interviewing – a lot. I needed a foot in the door. While I had a college degree, it certainly was not in IT or web development, so having zero experience in this field was a bit of a hurdle. I just didn’t let that stop me. I swallowed my pride and kept at it.

During one memorable interview I recall saying “I don’t know” so many times that once I left the building I promptly broke into tears of embarrassment.

But something very, very interesting happened.

They offered me that job the very next day.

I still remember taking the call. For privacy, I was standing in the rain outside an office building when the offer came in. I literally felt like I was being blessed at that moment. Suddenly I had a full time position that paid me more than any job I held previously. Suddenly our fears of losing our home vanished. Suddenly I could breath.

Why was I offered this amazing opportunity?

They told me I was given the job because I was honest enough to tell them what I didn’t know, I was eager enough to tell them I would learn whatever it took to be successful and they had seen the hard work I had put in to get as far as I did.

I was simply amazed how it had all worked out! … Can my failures lead to success?

The funny part is, that isn’t even my happy ending.

Shortly thereafter, My self-confidence grew. I met an amazing mentor who encouraged me to get my MBA due to my strong desire to be a leader and entrepreneur. “Knowledge is power,” he always said. Never. Stop. Learning.

So I did that too. I went on and earned my Master’s Degree and within a short time, I obtained a high level IT leadership position. I have also had the great opportunity to run my own successful online retail business since 2012. (Who needs sleep, right?)

While it didn’t happen in the timeline I expected, my dream did not die with my failure. It came true because of it. I am living my happy ending because of the risks I took and the lessons I learned. I guess being a total professional failure has its benefits!

Want to hear another confession?

I am nothing special. I am not a “one in a million” success story. You are just as entitled to have your happy ending as well and can achieve it by following these simple steps:

How Failures Lead to Success:

  1. Push Your Boundaries. Follow that dream, even if it is scary! Do your homework to try and reduce as much risk as possible, but you will never grow if you don’t try new things.
  2. Embrace Your Failures. If it doesn’t turn out as planned, take an honest look at what you can learn from it. Don’t let it defeat you – use failure to your advantage.
  3. Put Yourself Out There. Build a network and share your skills. Never give in to rejection.
  4. Work Your Butt Off. Work harder than anyone you know. Learn from every interaction and remember: never stop learning.

Are you ready to let your failures lead to success?

Please Rate:
Posted on 6 Comments

Designing Personal Space: Organize Your Interior to Boost Healthy Habits

Bedroom Sanctuary

Have you ever thought about how a simple thing like changing the color of your walls can impact your mood? Our environment has a huge influence on our psyche and the way we organize our personal space can make us feel different or encourage us to act a certain way. If you want to incorporate healthy habits into your lifestyle, you can be savvy and organize your home interior so that it impacts your everyday decisions and supports you on your path to a healthier you. Here are ways you can do that in four different rooms of your home, taking care of both your mind and body.

Give your kitchen a healthy makeover

Healthy Yogurt
Photo Source: Pixabay

The kitchen is the heart of the house – a favorite place of gourmands and the key room for preparing healthy meals. Of course, you should always keep your kitchen organized, tidy, and clean. But, how can you optimize it so that it encourages you to stick to healthy habits? First of all, declutter your space and throw away all the processed food (or at least – reduce it to a minimum). It’s a misconception that healthy nutrition has to be tasteless. You just have to make smarter choices, so keep that in mind when going grocery shopping next time. Invest in a good juicer and leave fruit on display: that way, you’ll get a visual reminder to eat healthy. You’ll start to associate your kitchen with health and it won’t take long before you form new habits.

Make your exercising room workout-inspiring

Make Workout Room Inspiring
Photo Source: Pixabay

Besides the obvious physical benefits of working out, it is also known as one of the best ways to achieve balance in mental health. Your exercising room should be designed accordingly: no cluttered space, no dull colors, and no distractions. It’s a place where you should find inspiration to stay committed to your fitness goals. Yoga is a great way to stay physically active while taking care of your mind, too. Eastern philosophy is layered and deep, so it’s not surprising many people step away from the Western exercising techniques and turn to it instead. Always have a yoga mat ready and try meditating. Decorate your room with prayer flags and candles in order to create a space filled with serenity. Design your room so that it’s inviting and you associate it with a peaceful feeling of doing something good for yourself. Depending on the type of your physical activity, you should color the walls to boost up your level of energy or calm you down.

Design your bedroom as a personal sanctuary

Bedroom Sanctuary
Photo Source: Pixabay

We often go to bed overwhelmed with negative thoughts, which may create a restless feeling and cause insomnia. You can try to make the best of designing your bedroom so that it’s your personal sanctuary. Good sleep is crucial for one’s healthy functioning. Opt for a calming color for the walls (pastel ones work the best) and make it as warm and welcoming as possible. Pick natural fabrics for the sheets and light a few scented candles before going to bed. Opt for soothing and calming scents (e.g. lavender) and you’ll feel the tranquility you’ve been craving for.

Fill your living room with light and greenery

Design room with light and greenery
Photo Source: Pexels

The living room is most frequently the noisiest one, as it is the room for socializing. It should reflect who you are through home décor. Consider the overall style of your interior design and try to adapt the details to it. Make sure your living room has a lot of light since it impacts your health more than you probably assume. The presence of plants can also have an influence, as they create a connection to nature, clean the air, and also help with your work flow – who knew!

Being healthy goes beyond just eating smart and exercising, but it does take commitment to lead a healthy life. Designing strategies can empower you on your path: organize your space and get a little health boost in doing so.

Please Rate:
Posted on 7 Comments

Super Easy Tips on How to Use a Candle Wax Warmer

Using a candle wax warmer to generate fragrance throughout your home is an easy and safe alternative to burning candles. It simply takes choosing the correct wax warmer for your situation and the proper wax to melt. Here is a guide on how to use a candle wax warmer and several tips what type is best for you.

Plate Candle Wax Warmer:

Plate warmers are an affordable any easy way to heat candle wax. It is recommended to only use with jar candles and or wax melts in a proper glass dish. Never melt wax directly on the plate as it is a safety hazard!

Original Candle Warmer: This is a basic plate candle wax warmer which contains a heating plate to set a jar candle. Simply plug it in and turn on the dial switch. A light on the front will notify you if the warmer is currently on. You will notice that it will become warm to the touch in only a few seconds.

Auto Shutoff Candle Warmer: This candle wax warmer is also a plate warmer but also adds the security of turning off after 8 hours. This adds additional safety in case it is not turned off manually. This warmer also has a dial switch and a light to designate it is on. This warmer will also begin warming in a very short time. The auto shutoff warmer will turn off after 8 hours of use. If you would like to use it for a longer period, simply turn the switch back on after it shuts off.

As a reminder, the proper type of candle to use with a plate warmer is a small to medium-sized jar candle. Using wax melts on a plate warmer will cause the wax to melt onto the plate and cause damage to the unit. Lower melting point candles such as soy or beeswax will also melt easier than paraffin wax candles.

Dish Candle Wax Warmer:

Dish warmers are versatile as they can be used for jar candles as well as wax melts, beads or fragrance oils. To use it as a jar warmer, simply plug in the unit and place the jar candle on its base, much like the plate warmer. The dish would not be used in this scenario. To use the wax warmer to melt wax tarts of heat oil, then place the included dish on top of the plate and it will heat the wax inside it.

Jar candles in beeswax or soy wax are also recommended for dish warmers. Soy wax cubes, or fragrance oils can be heated in the dish.

Illuminated Electric Wax Warmer:

Candle warmers that utilize a light bulb can spread the desired fragrance throughout your home, and can also add the glow of a candle without the flame. Plug in the electric candle wax warmer and place the dish over the light bulb. In a few seconds, the dish will begin to warm. You can heat wax melts, fragrance oils or beads in illuminated wax warmers. If the bulb needs replacing, see our replacement guide to help you determine which bulb will fit your warmer.

Never place a higher wattage bulb into an illuminated wax warmer or lamp in order to make it hotter and melt paraffin candles. If the wax in our warmer is not melting, switch to a lower melting wax such as soy.

Lamp Candle Warmer:

Lamp candle warmers are similar to the Illumination wax warmer in the fact that they are heated by a halogen light bulb. They are turned on by a dial switch on the cord. The candle is placed beneath the light bulb and the candle is heated from the top down, releasing the scent. Some models are self-contained  or some models have lamp shades that can be interchanged. As with the other types of plate warmers, only use a lower melting point jar candle such as soy or beeswax to achieve a consistent melt. As stated with the illuminated wax warmers, never use a higher wattage bulb to encourage higher heat. If the candle you are using under a lamp candle warmer does not melt, then it has a higher melting point and is not the best choice for a wax warmer.

Plugin Wax Warmer:

Plugin, or pluggable wax warmers are a great choice for small rooms such as bathrooms or an office. The plugin warmer works much like a night-light. It plugs into a wall outlet and has an on/off switch. It is heated by a small light bulb inside. A small dish holds wax melts beads or fragrance oils that are then heated by the light. The light that shines through the ceramic holder creates an ambiance without the open flame of a candle.

Candle Warmer Crock:

Candle warmer crocks are candle warmers that surround a jar candle. One item to note is that candle warmer crocks do not use light bulbs to heat the candle so they do not illuminate the room. The warmer is turned on by a dial switch and heats the candle from the bottom, similar to a plate warmer. The wax warmer surrounds the sides, quickly releasing the scent of the candle.

There you have it, a quick guide to the basic types of candle wax warmers on the market. While there may be other styles available, this guide covers the basics to hopefully give you the information you need to make an informed choice.

If this guide taught you how to use a candle wax warmer, please share in the comments below!

Thanks for reading,

-Tracy

  • The Autumn Druzy Bracelet Collection

    Sale! $47.50 $33.25
    Add to cart
  • Metal Stamp Wrap Bracelet Wearing

    Personalized Metal Stamp Wrap Bracelet

    Sale! $19.99 $13.99
    Add to cart
  • Black & Pearl Druzy Stacker Bracelet

    Black & Pearl Druzy Stacker Bead Bracelet

    Sale! $14.99
    $10.49
    Select options This product has multiple variants. The options may be chosen on the product page
  • Peach Druzy Stacker Bracelet

    Peach Druzy Stacker Bead Bracelet

    Sale! $14.99
    $10.49
    Select options This product has multiple variants. The options may be chosen on the product page
  • White Stacker Bracelet

    White Stacker Bead Bracelet

    Sale! $14.99
    $10.49
    Select options This product has multiple variants. The options may be chosen on the product page
  • The Brookelyn Bracelet Collection

    The Brookelyn Druzy Bracelet Collection

    Sale! $44.50 $31.15
    Add to cart
  • Druzy Agate Slice and White Howlite Bead Bracelet

    Purple Druzy Agate Slice and White Howlite Bead Bracelet

    Sale! $29.99
    $20.99
    Select options This product has multiple variants. The options may be chosen on the product page
  • Druzy Agate Slice and Green Square Heishi Beads

    Druzy Agate Slice and Green Square Heishi Bead Bracelet

    Sale! $29.99
    $20.99
    Select options This product has multiple variants. The options may be chosen on the product page
Please Rate:
Posted on 1 Comment

How to Replace a GU10 25W Wax Warmer Bulb

Wax Warmer Replacement Bulb NP5

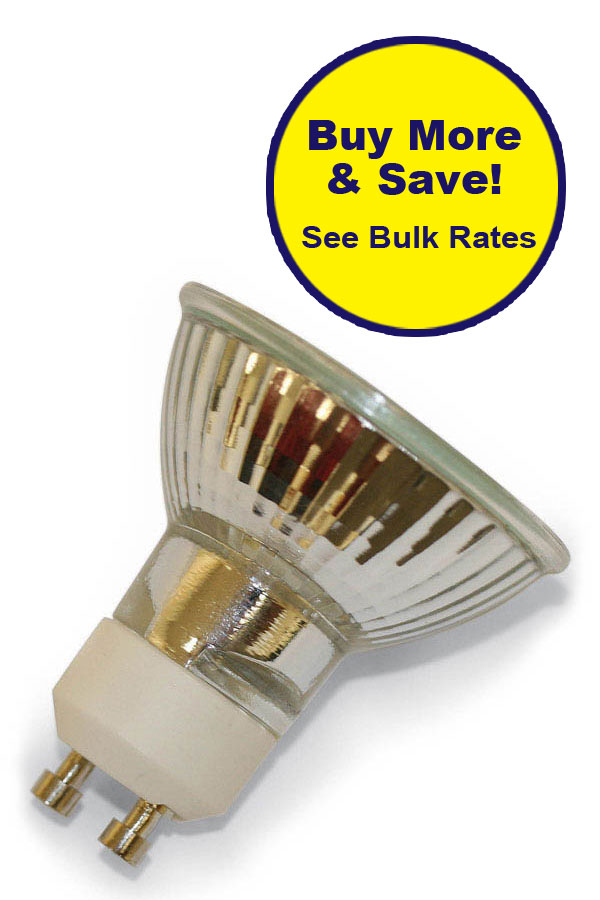
If you own a Candle Warmer, Etc. brand wax warmer built after 2008, you may eventually need to replace a GU10 25W wax warmer bulb that heats the wax or candle.

This tutorial is designed to explain how to replace a replace a GU10 25W wax warmer bulb from your electric wax warmer. You can tell that you have a GU-10 bulb by the knobs on the ends of the prongs. (See image)

NP5 Bulb Prongs
NP5 GU-10 Bulb Prongs

What you need:

Replace a GU10 25W Wax Warmer Bulb
Wax Warmer Replacement Bulb NP5

First, unplug the wax warmer from the wall. Next, remove the ceramic dish from the top of the warmer and place it out of the way. It should just sit on top of the base and remove easily. Place your glove or towel on the hand you will be using to hold the bulb. The glove protects the bulb from oils on your skin that can cause overheating and it protects your hand in case of the bulb breaking. While holding the candle warmer firmly in one hand, use you other hand to turn the halogen bulb in a counter-clockwise direction (to the left). It will resist the turn until it hits about a quarter of the turn. It will then release and move easily. Continue to turn counter-clockwise until the bulb turns free of the warmer.  To replace with the new bulb, reverse the process by placing the bulb prongs into the slots. Turn the bulb clockwise (to the right) until it feels tights in the socket. Replace the dish and plug it in. when you turn on the switch, your candle warmer should light up.


  • NP5 Replacement Bulb

    4 Pack Wax Warmer Replacement Bulb NP5 MR-16 Halogen

    Sale! Original price was: $19.99.Current price is: $15.99.
    Add to cart

Please Rate:
Posted on 3 Comments

One Fatal Flaw in Your Ecommerce Marketing

Fatal Flaw in Your Ecommerce Marketing

You just launched your online store and are anxious to bring visitors to your store. Visitors = Sales, right? With so many options to drive traffic to your store and no real benefit for ad sellers to teach you the insider secrets of ecommerce marketing, it can be easy to market in a less-than-effective manner, which will cost you dearly!

I have worked in the Ecommerce industry for over 10 years, and have had the pleasure to work with some large marketing budgets and stellar IT departments. One of the biggest reasons I went into business for myself was because many of these companies do not implement this important traffic-driving concept. I was so surprised at how much advertising dollars they would just throw away!

So what is the most efficient ecommerce marketing approach you can take in driving traffic to your online store?

Drive traffic with the intent to generate leads, not direct sales.

Confused?

Look at this example:

Scenario 1:

Let’s say you agree to spend $0.60 per click on a keyword that directs customers to your bestselling product.

Your potential customer clicks the ad while they are researching your product. They land on your page and learn if they are interested or not. 9 times out of 10, they will not purchase on the first visit. Now they are gone and you are out $0.60. Hopefully they will be back!

Scenario 2:

You agree to spend $0.60 per click on a keyword that directs customers to a highly optimized landing page offering a free “something” such as a discount for signing up for your online catalog which sells the product(s) they are looking for. They sign up and continue to research the product they want.

They have not bought anything from you today, but you’ve collected something just as valuable (if not more) – their email address! You have just gained an ongoing connection with that future customer. This allows you to build your brand awareness and a relationship with your customers by sending them valuable content and promotions. When the time is right to buy, they will think of you … not just once, but over and over. Well worth the $0.60!

Now you may be thinking that the lead generation link in Scenario 2 will not convert 100% and you will lose some ad dollars there as well. That may be true, but your conversion rate on offering a free “something” in return for an email will be significantly higher than a direct purchase conversion rate.

To put it in perspective, my direct buy conversions ranked in the 3% rate. When I switched my method to my catalog signups, my Adwords conversion rate was as high as 39%. (That made my cost-per-click rate drop way down as well.)

Adwords Success Certificate

In the course of an ad campaign the lead generating approach can significantly lower your ad expenses, create a growing list of potential customers and increase your brand awareness. This will improve your online business’s gross profit.

With an online store and ad retailers contacting you from all directions you can now feel more confident in your ecommerce marketing strategy if you know you are collecting leads for an ongoing relationship versus a one-and-done sale.

Have you had luck with the lead generation approach for your online store? Please let me know in the comments below!

Thanks for reading,

-Tracy

Please Rate:
Posted on

3 Little Known Tips to Reduce Negative Thinking

Reduce Negative Thinking

When you hear the question, “Do you see the glass half full or half empty,” what do you say? Do you smile and say you are an optimist but secretly admit that you don’t see the bright side of things as often as others? Or, do you openly admit that you are a pessimist and have been told that you are too negative? Are you looking to reduce negative thinking? If being a pessimist has caused some conflict in your life or you simply wish for more positivity, then these three tips may help you get the shift you need.

Tips to Reduce Negative Thinking

1. Make Pessimism a Strength

Do you tend to see the obstacles way ahead of everyone else? Have you thought “I told you so” more times than you can count? If so, then you probably are a strategic thinker. If you are strong in strategic thinking then you will find yourself looking ahead and analyzing the “big picture” more than task-oriented thinkers. While some people are focused on today, this strength allows you to focus on tomorrow and beyond.

This thought process may be what drives your pessimism and negative thinking. Being able to look further down the road will naturally bring questions and concerns that others may have not considered. Instead of seeing your observations as pessimism, change your outlook to focus on the strength of helping the group avoid pitfalls long-term. Present your “negatives” as the value you bring to the group and this may help you reduce negative thinking.

2. Focus on Delivery

While you may find your observations a strength, be careful how you communicate. The delivery of your message will make or break you – period. Optimists want to focus on the positives, so they will hear your concerns as negativity unless presented in a specific way. I have learned from experience that these communication techniques work best for me:

  1. Only share the concern mostly closely related to the topic of the current conversation. If you share too much or discuss long-range concerns too soon, others will not absorb all of what you are saying. This will lead them to believe that you are just being negative.
  2. Be open-minded. You may believe you “know” the outcome, but if you are seen as unwilling to listen or unwavering in your decision, others will feel that you are just being difficult to work with. You may have to actively allow other ides to be presented in order to move forward.
  3. Utilize positive attitude and body language. If you seem defensive, sit closed off or look inattentive with your group, then any concerns that you present will generally be received as pessimistic.

If you pay close attention to how you deliver your concerns and at what point in the conversation you share them, you will find that others will react to you in a more positive way.

3. Go Along for the Ride

If there is one thing I have learned from being a pessimist is that you need to go along for the ride. Stay quiet more than you speak, listen more than you share and be open to ideas of the conversation. Deliver only what is relevant in the moment and understand that for many people, the path to resolution is like an onion. The layers will be peeled back; it just takes time to get there. Think of each step as moving in the right direction.

While being a pessimist has the stigma of being a negative personality trait, it is actually a strength that many groups need in order to be successful. If you present your ideas in an open and planned manner, others will be less inclined to see you as having a negative influence and more as a strong mentor of the long-term vision. Once the perception of negativity shifts, more positivity and the ability to build self-confidence is sure to come into your life.

Thanks for reading,

-Tracy

Please Rate: