Posted on 4 Comments

How to Keep House Sparrows Off Suet Feeders

Keep House Sparrows Off Suet Feeders

Do you have a suet feeder that is being taken over by invasive birds such as House Sparrows (HOSP)? Do you watch helplessly as your feed disappears and the desirable birds get chased away? If you are interested in learning how to keep House Sparrows off suet feeders, please read further!

Materials:

  • Wire hanging suet feeder
  • Suet Cake
  • Cover for suet feeder (I used a plastic flower pot)

Earlier this Spring I realized that I was not attracting as many birds to my yard as previous years. I waited and watched, but became a frustrated looking at the bird bath and feeders sit vacant. I usually get Downey Woodpeckers at my suet feeders, so as an attempt to bring ANY birds back, I put out my suet feeder early. This was something I had usually only put up in the fall and winter because I thought suet would melt, but recently learned that you could use certain types of suet all year.

I hung the suet feeder out on the chain-link-fence of our dog’s kennel and waited for my Woodpeckers to arrive. What happened next shocked me. Within a few days I had birds – LOTS of birds. Lots and lots of House Sparrows to be more specific.

At first I didn’t mind. I wasn’t familiar with how much of a nuisance House Sparrows can be and I also felt like other species of birds followed … but I quickly learned how bad it can get!

Within hours the sparrows could devour the entire suet cake. I started to wonder if I would need to make my own suet to afford feeding the birds, but I could see that feeding them was only making the problem worse. It quickly became a mission to deter Sparrows from consuming everything within their reach and bullying the more desirable birds.

After a bit of research, I learned that I had to make two adjustments to discourage the House Sparrows.

Keep House Sparrows Off Suet Feeders

1. Remove the Suet Feeder from the Fence

Sparrows approach landing on feeders from the top. If you watch them, you will notice that they will try to avoid coming up from the bottom. By putting the feeder on the fence, it not only allowed them to approach the suet feeder from the top, but also encouraged them to all flock together on the fence and over-take the suet cake. (Some suggest using Feeder Halos, but I felt it would lose its effect over time, and could harm birds in the process.)

I removed the feeder from the fence and hung it under the overhang of my house. It also had to be far enough away that they could not jump to it from another perch. The results were noticeable! The flocks were gone and most sparrows did not attempt to land on it. While I noticed some daring ones, they were few … for a few days.

They learn… They adapt… They eat a lot of suet!

After a few days, the numbers of sparrows were not as high as when it was hanging on the fence, but this was not an acceptable solution on its own. I had to make another adjustment.

2. Cover the top of the suet feeder

Sparrows cannot hang upside down to eat, but song birds such as the Woodpeckers, Nuthatches and Chickadees are very comfortable hanging while eating. Covering the top portion keeps sparrows from being able to reach the suet.

I noticed that there are a few models of covered suet feeders for sale, but before I invested I wanted to make sure this technique would work.

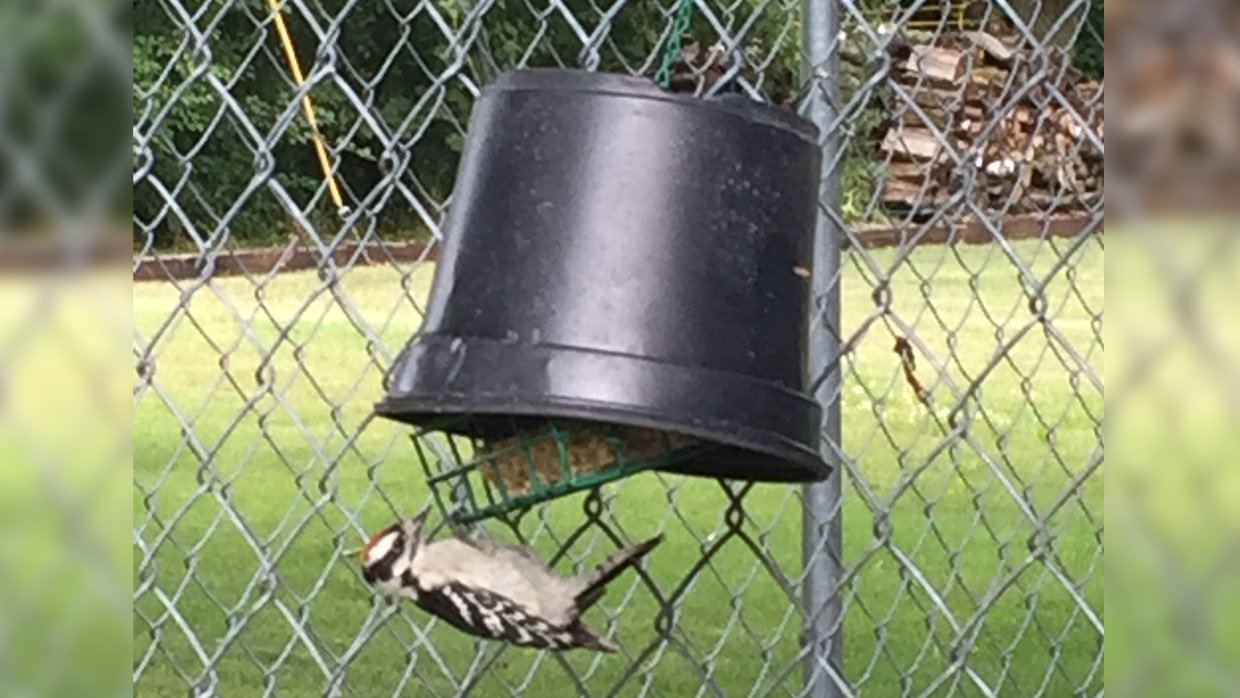
I simply took the square feeder that was hanging vertically and moved the chain to hang it horizontally. (fig 1) I had a plastic flower pot that fit the top, so I covered the top portion and left the bottom exposed.

(fig. 1) Suet Feeder Horizontal


Suet Feeder Hanging
Suet Feeder Hanging

I tried to hang it back on the fence (as seen in the top image), but the sparrows perched below the feeder and were able to eat the suet. I put the feeder back up under the overhang.

These steps combined made all the difference. I have had this up the entire summer and fall, and the sparrows have all but given up! While the sparrows are gone, I have the more desirable birds visiting and feeding comfortably at the suet feeder. I am able to enjoy my birds without going broke in the process!

If you would like to keep House Sparrows off suet feeders, try these tips together.

To summarize

  1. Hang the feeder under an overhang to discourage top landing
  2. Cover the top of the feeder to only allow birds that can hang upside down to feed
  3. Enjoy your backyard birds!

Do you have any other suggestions to keep sparrows off your feeders? Please share in the comments below.

Thanks for reading,
-Tracy

Please Rate:
Posted on 6 Comments

Designing Personal Space: Organize Your Interior to Boost Healthy Habits

Bedroom Sanctuary

Have you ever thought about how a simple thing like changing the color of your walls can impact your mood? Our environment has a huge influence on our psyche and the way we organize our personal space can make us feel different or encourage us to act a certain way. If you want to incorporate healthy habits into your lifestyle, you can be savvy and organize your home interior so that it impacts your everyday decisions and supports you on your path to a healthier you. Here are ways you can do that in four different rooms of your home, taking care of both your mind and body.

Give your kitchen a healthy makeover

Healthy Yogurt
Photo Source: Pixabay

The kitchen is the heart of the house – a favorite place of gourmands and the key room for preparing healthy meals. Of course, you should always keep your kitchen organized, tidy, and clean. But, how can you optimize it so that it encourages you to stick to healthy habits? First of all, declutter your space and throw away all the processed food (or at least – reduce it to a minimum). It’s a misconception that healthy nutrition has to be tasteless. You just have to make smarter choices, so keep that in mind when going grocery shopping next time. Invest in a good juicer and leave fruit on display: that way, you’ll get a visual reminder to eat healthy. You’ll start to associate your kitchen with health and it won’t take long before you form new habits.

Make your exercising room workout-inspiring

Make Workout Room Inspiring
Photo Source: Pixabay

Besides the obvious physical benefits of working out, it is also known as one of the best ways to achieve balance in mental health. Your exercising room should be designed accordingly: no cluttered space, no dull colors, and no distractions. It’s a place where you should find inspiration to stay committed to your fitness goals. Yoga is a great way to stay physically active while taking care of your mind, too. Eastern philosophy is layered and deep, so it’s not surprising many people step away from the Western exercising techniques and turn to it instead. Always have a yoga mat ready and try meditating. Decorate your room with prayer flags and candles in order to create a space filled with serenity. Design your room so that it’s inviting and you associate it with a peaceful feeling of doing something good for yourself. Depending on the type of your physical activity, you should color the walls to boost up your level of energy or calm you down.

Design your bedroom as a personal sanctuary

Bedroom Sanctuary
Photo Source: Pixabay

We often go to bed overwhelmed with negative thoughts, which may create a restless feeling and cause insomnia. You can try to make the best of designing your bedroom so that it’s your personal sanctuary. Good sleep is crucial for one’s healthy functioning. Opt for a calming color for the walls (pastel ones work the best) and make it as warm and welcoming as possible. Pick natural fabrics for the sheets and light a few scented candles before going to bed. Opt for soothing and calming scents (e.g. lavender) and you’ll feel the tranquility you’ve been craving for.

Fill your living room with light and greenery

Design room with light and greenery
Photo Source: Pexels

The living room is most frequently the noisiest one, as it is the room for socializing. It should reflect who you are through home décor. Consider the overall style of your interior design and try to adapt the details to it. Make sure your living room has a lot of light since it impacts your health more than you probably assume. The presence of plants can also have an influence, as they create a connection to nature, clean the air, and also help with your work flow – who knew!

Being healthy goes beyond just eating smart and exercising, but it does take commitment to lead a healthy life. Designing strategies can empower you on your path: organize your space and get a little health boost in doing so.

Please Rate:
Posted on 7 Comments

Super Easy Tips on How to Use a Candle Wax Warmer

Using a candle wax warmer to generate fragrance throughout your home is an easy and safe alternative to burning candles. It simply takes choosing the correct wax warmer for your situation and the proper wax to melt. Here is a guide on how to use a candle wax warmer and several tips what type is best for you.

Plate Candle Wax Warmer:

Plate warmers are an affordable any easy way to heat candle wax. It is recommended to only use with jar candles and or wax melts in a proper glass dish. Never melt wax directly on the plate as it is a safety hazard!

Original Candle Warmer: This is a basic plate candle wax warmer which contains a heating plate to set a jar candle. Simply plug it in and turn on the dial switch. A light on the front will notify you if the warmer is currently on. You will notice that it will become warm to the touch in only a few seconds.

Auto Shutoff Candle Warmer: This candle wax warmer is also a plate warmer but also adds the security of turning off after 8 hours. This adds additional safety in case it is not turned off manually. This warmer also has a dial switch and a light to designate it is on. This warmer will also begin warming in a very short time. The auto shutoff warmer will turn off after 8 hours of use. If you would like to use it for a longer period, simply turn the switch back on after it shuts off.

As a reminder, the proper type of candle to use with a plate warmer is a small to medium-sized jar candle. Using wax melts on a plate warmer will cause the wax to melt onto the plate and cause damage to the unit. Lower melting point candles such as soy or beeswax will also melt easier than paraffin wax candles.

Dish Candle Wax Warmer:

Dish warmers are versatile as they can be used for jar candles as well as wax melts, beads or fragrance oils. To use it as a jar warmer, simply plug in the unit and place the jar candle on its base, much like the plate warmer. The dish would not be used in this scenario. To use the wax warmer to melt wax tarts of heat oil, then place the included dish on top of the plate and it will heat the wax inside it.

Jar candles in beeswax or soy wax are also recommended for dish warmers. Soy wax cubes, or fragrance oils can be heated in the dish.

Illuminated Electric Wax Warmer:

Candle warmers that utilize a light bulb can spread the desired fragrance throughout your home, and can also add the glow of a candle without the flame. Plug in the electric candle wax warmer and place the dish over the light bulb. In a few seconds, the dish will begin to warm. You can heat wax melts, fragrance oils or beads in illuminated wax warmers. If the bulb needs replacing, see our replacement guide to help you determine which bulb will fit your warmer.

Never place a higher wattage bulb into an illuminated wax warmer or lamp in order to make it hotter and melt paraffin candles. If the wax in our warmer is not melting, switch to a lower melting wax such as soy.

Lamp Candle Warmer:

Lamp candle warmers are similar to the Illumination wax warmer in the fact that they are heated by a halogen light bulb. They are turned on by a dial switch on the cord. The candle is placed beneath the light bulb and the candle is heated from the top down, releasing the scent. Some models are self-contained  or some models have lamp shades that can be interchanged. As with the other types of plate warmers, only use a lower melting point jar candle such as soy or beeswax to achieve a consistent melt. As stated with the illuminated wax warmers, never use a higher wattage bulb to encourage higher heat. If the candle you are using under a lamp candle warmer does not melt, then it has a higher melting point and is not the best choice for a wax warmer.

Plugin Wax Warmer:

Plugin, or pluggable wax warmers are a great choice for small rooms such as bathrooms or an office. The plugin warmer works much like a night-light. It plugs into a wall outlet and has an on/off switch. It is heated by a small light bulb inside. A small dish holds wax melts beads or fragrance oils that are then heated by the light. The light that shines through the ceramic holder creates an ambiance without the open flame of a candle.

Candle Warmer Crock:

Candle warmer crocks are candle warmers that surround a jar candle. One item to note is that candle warmer crocks do not use light bulbs to heat the candle so they do not illuminate the room. The warmer is turned on by a dial switch and heats the candle from the bottom, similar to a plate warmer. The wax warmer surrounds the sides, quickly releasing the scent of the candle.

There you have it, a quick guide to the basic types of candle wax warmers on the market. While there may be other styles available, this guide covers the basics to hopefully give you the information you need to make an informed choice.

If this guide taught you how to use a candle wax warmer, please share in the comments below!

Thanks for reading,

-Tracy

  • The Autumn Druzy Bracelet Collection

    Sale! $47.50 $33.25
    Add to cart
  • Metal Stamp Wrap Bracelet Wearing

    Personalized Metal Stamp Wrap Bracelet

    Sale! $19.99 $13.99
    Add to cart
  • Black & Pearl Druzy Stacker Bracelet

    Black & Pearl Druzy Stacker Bead Bracelet

    Sale! $14.99
    $10.49
    Select options This product has multiple variants. The options may be chosen on the product page
  • Peach Druzy Stacker Bracelet

    Peach Druzy Stacker Bead Bracelet

    Sale! $14.99
    $10.49
    Select options This product has multiple variants. The options may be chosen on the product page
  • White Stacker Bracelet

    White Stacker Bead Bracelet

    Sale! $14.99
    $10.49
    Select options This product has multiple variants. The options may be chosen on the product page
  • The Brookelyn Bracelet Collection

    The Brookelyn Druzy Bracelet Collection

    Sale! $44.50 $31.15
    Add to cart
  • Druzy Agate Slice and White Howlite Bead Bracelet

    Purple Druzy Agate Slice and White Howlite Bead Bracelet

    Sale! $29.99
    $20.99
    Select options This product has multiple variants. The options may be chosen on the product page
  • Druzy Agate Slice and Green Square Heishi Beads

    Druzy Agate Slice and Green Square Heishi Bead Bracelet

    Sale! $29.99
    $20.99
    Select options This product has multiple variants. The options may be chosen on the product page
Please Rate:
Posted on 1 Comment

How to Replace a GU10 25W Wax Warmer Bulb

Wax Warmer Replacement Bulb NP5

If you own a Candle Warmer, Etc. brand wax warmer built after 2008, you may eventually need to replace a GU10 25W wax warmer bulb that heats the wax or candle.

This tutorial is designed to explain how to replace a replace a GU10 25W wax warmer bulb from your electric wax warmer. You can tell that you have a GU-10 bulb by the knobs on the ends of the prongs. (See image)

NP5 Bulb Prongs
NP5 GU-10 Bulb Prongs

What you need:

Replace a GU10 25W Wax Warmer Bulb
Wax Warmer Replacement Bulb NP5

First, unplug the wax warmer from the wall. Next, remove the ceramic dish from the top of the warmer and place it out of the way. It should just sit on top of the base and remove easily. Place your glove or towel on the hand you will be using to hold the bulb. The glove protects the bulb from oils on your skin that can cause overheating and it protects your hand in case of the bulb breaking. While holding the candle warmer firmly in one hand, use you other hand to turn the halogen bulb in a counter-clockwise direction (to the left). It will resist the turn until it hits about a quarter of the turn. It will then release and move easily. Continue to turn counter-clockwise until the bulb turns free of the warmer.  To replace with the new bulb, reverse the process by placing the bulb prongs into the slots. Turn the bulb clockwise (to the right) until it feels tights in the socket. Replace the dish and plug it in. when you turn on the switch, your candle warmer should light up.


  • NP5 Replacement Bulb

    4 Pack Wax Warmer Replacement Bulb NP5 MR-16 Halogen

    Sale! Original price was: $19.99.Current price is: $15.99.
    Add to cart

Please Rate:
Posted on

Super Easy Salt Dough Gift Tag Ornaments Tutorial

Salt Dough Gift Tag Ornaments

Salt dough gift tag ornaments are a great way to start a meaningful tradition. With this tutorial you can learn how to create your own tags and add your own special touch. They are so easy to make and attaching them to gifts is a very  thoughtful way to show how much you really care!

Here we go!

Ingredients:
2 cups flour
1 cup salt
1 cup water

Other Tools:
Board and rolling-pin
Mini cutters
Rubber stamp(s)
Colored ink
Pencil (to create hole)
Cookie sheet to dry
Sandpaper
Ribbon

Mix the flour and salt in a large bowl and slowly add in the water. Mix the ingredients until it forms a doughy consistency. Knead the dough with your hands until the dough is smooth. Dust the cutting board and rolling-pin with flour and roll out the dough until it is about a quarter of an inch thick.

Ink your rubber stamp with ink and lightly stamp the dough while it is rolled flat. Take your mini cutter and cut the shapes out of the dough. Use the stamp designs to create interesting patterns on the gift tags.

Place the cut-outs on a cookie sheet to dry. Take a pencil or other utensil to punch a hole for the ribbon. The cut-out gift tags can either be air-dried or you can bake them in an oven on 200 degrees F for 2 – 3 hours. Once the tags are dry, take a light grit sandpaper to smooth any rough edges.

The finishing touch is a ribbon tied through the hole to hang the ornament for viewing!

That’s it! This is a super easy craft project that adds such a nice touch of thoughtfulness to any gift. I have gotten such positive feedback from my customers when I gave these out with each order. I love adding that personal touch!

P.S. The wonderful inspiration of this salt dough gift tag ornaments project was a blog post I found on Pinterest. DIY Wedding Favors: Salt Dough Tags gives a nice walk through if you’d like more details.

Please Rate:
Posted on

Fabulous Fall Pumpkin Mod Podge Idea

Fall Pumpkin Mod Podge Idea

I don’t know about you, but seeing autumn leaves at the peak of their vibrant colors on a bright sunny day is just one of those situations that really make me stop and sense the passing of time. The beauty of today will quickly fade and the chill of winter will soon be upon us. I always wish to hold on to the moment a bit longer.

This is a perfect project to display the colors of the season in a festive way. It is so easy to do and impossible to mess up. This is also a nice kid-friendly project as all the materials are easy to clean up and natural. My nine-year old daughter helped me put this collection together and we had a great time doing it.

Let’s get started!

What you need for this Fall Pumpkin Mod Podge Idea:

  • Colorful fall leaves, pressed (explanation to follow)
  • Pumpkins, we used both orange and white but you can use whatever types you’d like.
  • Mod Podge (You can choose shiny or matte, we used shiny)
  • 1 inch paint brush
  • Newspaper to cover the work space
  • Toothpicks to secure the leaves
  • Scissors to trim stems

Part 1: Fall leaf collection:

When the colors are at their peak, go outside and collect a variety of colors and types of leaves, making sure the leaves are fresh enough that they are not curling on the edges. Also, make sure you to collect enough leaves! Some things to consider:

  • The number of pumpkins you plan to cover.
  • The size of the pumpkins.
  • Whether you are covering the front only or the entire pumpkin.

We just covered the front, and our pumpkins are 8 – 10 inches in size. We used about 10 leaves per pumpkin. We did use more than we expected!

Once the leaves are collected, place the leaves on newsprint and press them with a heavy object to flatten them out. We pressed ours for a week, but next time I think I will not wait so long as the leaves were stiffer than I’d like and forming them to the pumpkins was more challenging than expected. I believe if they were a bit fresher, it would have been easier. (If you try it sooner, let me know your results!)

  • Pumpkin Electric Wax Warmer

    Friendly Pumpkin Electric Wax Warmer

    $16.99
    Add to cart
  • Pumpkin Plugin Wax Warmer

    Adorable Pumpkin Plugin Wax Warmer

    $9.99
    Read more

Part 2: Mod Podge Time!

Lay the newspaper on the surface you will be working, as it may get a bit messy with the amount of Mod Podge needed. Next, just spread Mod Podge on both the surface of the pumpkin and the back of the leaves. The glue will look white and cloudy, but it will dry clear. The glue takes a while to dry, so do not be afraid to move the leaves around to get the perfect collage. If a leaf does not want to stay in place, simply tack a toothpick into the edges of the leaf to secure. Be sure to mix the colors and style of leaves. Change direction and create a colorful fall leaf display!

Next, let the leaves dry, checking on them periodically to make sure they did not slide down or curl up on the edges. Add tooth picks to secure curling areas. Adding additional coats may be helpful for the stubborn areas. Just make sure to remove your toothpicks before the glue becomes too dry or the glue will pull up on removal. Next, trim any stems that are sticking out or too long.

Once it is dry, it is finished! Simply arrange the pumpkins inside or outside for a festive and colorful display. What a great way to preserve the colors of the season!

If you try this Fall Pumpkin Mod Podge Idea, let us know in the comments below!

Thanks for reading!

-Tracy

Please Rate:
Posted on

7 Benefits of Soy Wax Candles

Benefits of Soy Wax

Soy wax candles are a pure, safe way to provide a fragrant home. We have listed the top seven benefits of soy wax to help you decide if soy wax is right for you.

  1. More Natural: Soy wax candles are simply made from soy wax, which is the processed form of soybean oil. While some pillar soy wax candles may have additives included to assist with increasing the burning point, many soy candles are purely wax, leaving you with a clean and natural candle.
  2. Clean Burning: Because soy candles usually do not have other additives mixed in, they burn much cleaner than other types of candles. Less soot and smoke will be released into your home, greatly reducing the toxic carcinogens that may be present with other types of candles.
  3. Lower Burn Point: Many soy candles will be in containers or melted in candle warmers due to a lower burning point. This will allow the candle to burn longer and slower providing a longer lasting scent.
  4. Quality: Because many soy candles are made in the United States, you will not receive candles that contain lead based wicks, which are toxic to breathe when lit. Also, because soy wax has a lower melting point, some soy candles will not even require a wick and can be heated with a candle warmer.
  5. Safety: Soy candles can have a safety component to them if you use flame-less candles, candle warmers or heating lamps to warm the wax. This will greatly reduce the chance of a fire hazard or a burn from a wicked candle.
  6. Clean Scent Throw: Due to the pure form of soy wax, the fragrance is not contaminated with additives that other types of candles may contain. This leaves a cleaner, more fragrant form of the scent.
  7. Cost Effective: Soy candles can be melted over and over, generally lasting twice as long as a paraffin wax candle. This greatly reduces the cost of candles over time.

Hopefully these seven benefits of soy wax will help you decide if melting soy wax melts or candles is the best choice for you. To see our full line of Jamie Clair Soy Wax Melts, please visit our store today.

Helpful tutorials:

How to Use a Candle Wax Warmer

How to Replace a Candle Wax Warmer Bulb

Please Rate:
Posted on 7 Comments

What is Your Wax of Choice? Find the Best Candle Wax for You

What is Your Wax of Choice - janet & clarence
What is Your Wax of Choice – janet & clarence

Whether making or buying candles, deciding on the type of wax the candles will be made of can impact how successful the candle will be, or how well it will burn. The wax type of candles can also be based on personal preference, so determining your wax of choice ahead of time will help you enjoy your candles more.

Is Your Wax of Choice Beeswax?

Beeswax is a natural wax produced in the beehive of honeybees. Although firmer than soy wax, beeswax itself is a fairly soft wax and can be pliable at room temperature if in a thin sheet. This makes it an easy approach to getting into candle making. Here are some facts of beeswax:

Please Rate: